BASEL

PREMIUM WOOCOMMERCE THEME by XTemos v1.0

Basel theme documentation

Thank you for purchasing our BASEL premium WordPress theme! In this document you will find a lot of valuable information and manuals about our theme installation, usage and customization. If you have any questions concerning the information missing in this documentation, please visit our support forum at xtemos.com/forums.
So you can start from Requirements and Installation

Requirements & WordPress set up To top

You need to have a fresh WordPress installation on your web-site to use our theme.

General steps to install WordPress CMS to your site

  1. Download the latest WordPress version from https://wordpress.org/download/
  2. Upload zip file to your web-site root folder and unzip
  3. Create database (using your hosting panel)
  4. Set up wordpress. Detailed instructions

Here the list of useful links to install WordPress CMS

Recommended PHP Configuration Limits

Sometimes you may get some errors while installing our theme, importing content or activating plugins like white screen or PHP errors. They may be caused by low PHP configurations limits. In this case you need to increase some values. You can do this by your own or contact your hosting providers with the following requrements:

  1. memory_limit 128M
  2. post_max_size 32M
  3. upload_max_filesize 32M

Installation Process To top

Download the latest theme version from themeforest

Download theme from themeforest. In the Downloads area you can find all your purchases.

Unzip theme package file and find basel.zip file that contains main theme folder.

Way 1 (wordpress admin): install theme through the admin panel

Locate basel.zip file and sign into your WordPress dashboard (e.g., ). Go to Appearance > Themes > Add New > Upload, and select the file, click “Install Now“. Once the theme is uploaded you will need to activate it in Appearance > Themes.

  1. Sign in to your admin panel in yourdomain.com/wp-admin
  2. Navigate to Appearance > Themes > Add New -> Upload theme
  3. Choose basel.zip file
  4. Wait while theme is uploading and activate it
Upload Theme with FTP

Way 2 (manual): upload through the FTP

You need to upload theme zip file to your-site.com/wp-content/themes folder and unzip it. You can use
your web-hosting control panel (cPanel, ISPManager etc.) or you can connect to your server through the
FTP client like FileZilla
and upload already unzipped file basel.zip

  1. Connect to your hosting (server) via FTP client
  2. Upload your theme folder to your-site.com/wp-content/themes folder
  3. Login to your WordPress Dashboard and go to Appearance > Themes and activate Theme.
  4. Open your site and check if everything is okay
Install Plugins

Before start working with our theme you need to install required and
recommended plugins that come with our theme package.

Here the list of required plugins

  1. Visual Composer
  2. Custom metaboxes
  3. Options Framework
  4. XZ Post Types
  5. WooCommerce (if you are going to create an internet-shop)

Optional plugins

  1. Revolution Slider
  2. Contact Form 7
  3. YITH WishList
  4. Twitter Widget
  5. Recent posts widget

You can install these plugins in admin panel -> Plugins.

But you can automatically install all plugins in Appearance -> Install Plugins

  1. Go to Appearance -> Install Plugins
  2. Check all plugins you want (required plugins are important for theme to work)
  3. Choose install and click “Apply”
  4. Wait untill all plugins will be installed

Install WooCommerce

If you skip previous section you need to install WooCommerce plugin
to set up your shop.

  1. Download the plugin to your computer.
  2. Unzip the file.
  3. Using an FTP client, or your hosting control panel, upload the unzipped plugin folder to your WordPress installation’s wp-content/plugins directory.
  4. Activate the plugin from the Plugins menu within the WordPress admin.
  5. Follow plugin’s set up steps and install shop pages
  6. Go to Products in admin panel and create your first products

How to install WooCommerce | WooThemes Documentation

Video | Installing and Uninstalling WooCommerce

Import Demo Content

After install the theme, required plugins and woocommerce pages you get blank site with basic WordPress and WooCommerce content. If you want to overview the pages and options from our demo site you can import a Demo Content.

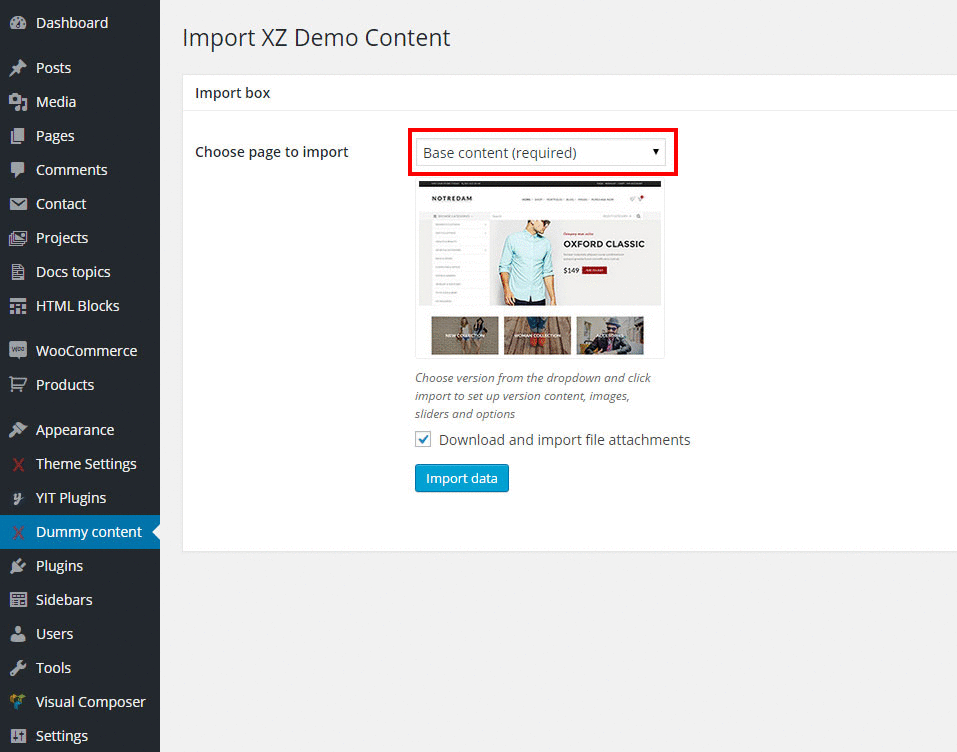
To do the import you need to go to the page “Dummy Content”. Here you can find a simple form, where you can select a page to import. Firstly you have to choose Base content (required) and click “Import data”. This option sets up on your site a few posts with images, demo products, portfolio page with base projects and home page with slider like our demo site has. Import process of all the pages may take a few minutes.

After base install you may import some other page from all our home versions.

Note: installing demo content doesn’t create site that is identical copy of our demo site because it has a big number of pages and images that takes to much time to complete.
Most images you see on our site are not included in our theme package and will not be imported.

Theme Options Panel To top

After installing our theme you are able to customize the view
of your web-site with our Theme Options panel. Here
you can find a lot of settings for:

  • General Layout
  • Page Heading
  • Header
  • Footer
  • Typography
  • Styles and colors
  • Blog
  • Portfolio
  • Shop
  • Product page
  • Custom CSS
  • Custom JS
  • Social
  • Performance

Options for pages To top

Another powerful tool to customize your web site is options for pages. You can configurate your layout, header, page title and others for any particular page.
List of available options:

  • Widget area
  • Main layout
  • Sidebar size
  • Header
  • Header color
  • Page title size
  • Page title color
  • Page title imag
  • Open categories menu

Check our theme updates, we will add more and more options for pages.

With our theme you can create footer of different layout and colors In Theme Options -> Footersome predefined variants of columns structure.
For example: if you set footer layout to “Three Columns” you will find 3 widget areas in Appearance -> Widgets so you can add any widgets here and will see them in 3 equal columns.

Using Visual Composer

The other way is to add HTML Block to the footer widget area. To do this you need to choose “Single Column” layout and add there a widget called XZ HTML Block. You can create this block using all the elements and layouts of Visual Composer plugin in HTML Blocks -> Add New.

Create menu To top

Theme extends standard functions for WordPress menu and makes it more flexible and powerful. In order to create menu you need to go Appearance->Menus and click create a new menu. After that add new items to the menu as you usually do it with wordpress and click “Save”. You will see new fields editing menu item like Design, Icon name, mouse event and image.

You can choose one of three possible variants for the menu item dropdown style:

  1. Default – simple dropdown column
  2. Full Width – full window width dropdown
  3. Set sizes – set your own width and height for the dropdown

After add all the necessary items to the menu you need to set it as a main navigation for your site in Appearance->Menus->Manage Locations

If you want to add widgets or shortcodes (posts, products, images etc.) you can create HTML Block and put it’s shortcode to the Description field.

Widgets To top

You can find some usefull widgets that included in our theme in Appearance -> Widgets. With our future updates we will provide more powerfull elements and widgets.
Current widgets list:

  1. XZ WooCommerce Layered Nav
  2. XZ Sort by
  3. XZ Price Filter
  4. XZ AJAX Search
  5. XZ User panel
  6. XZ Instagram
  7. XZ Banner
  8. XZ HTML Block
  9. XZ Author Information
  10. Recent Posts Extended
  11. Sidebar Mega Menu
  12. Simple twitter Tweets

HTML Blocks To top

As our theme comes with Visual Composer Drag & Drop builder we find it usefull to create a custom post type where you can build your own static HTML blocks and place it anywhere through the site using shortcode or widget.
Find this functionality in admin panel -> HTML Blocks. After adding some blocks you will see a shortcode for this block, place it at any other page, widget, footer etc.

Shortcodes To top

Today using native wordpress shortcode function is not comfortable and easy. Instead you can create your pages using Visual Composer elements (shortcodes). So all our theme shortcodes are available through the Visual Composer interface.
Full list of elements (shortcodes)

  1. Section title
  2. Blog
  3. Social buttons
  4. Button
  5. Portfolio
  6. Google Map
  7. Mega Menu widget
  8. Animated Counter
  9. Team Member
  10. WC products widget
  11. Testimonials slider
  12. Instagram
  13. Author area
  14. Promo Banner
  15. Posts (products) carousel

Portfolio To top

To show your projects/works/photo gallery or some other staff you can create “Portfolio” page. To do this firstly you need to create page with Page Template “Portfolio”. Then add your projects with images and texts in Admin -> Projects -> Add New

You can configure your portfolio using our Theme Options panel with a lot of options and variants.

  1. Portfolio Style
  2. Full screen portfolio
  3. Projects columns
  4. Space between projects
  5. Items per page
  6. Filter background
  7. Category filters
  8. Color scheme for filters

Contacts To top

If you haven’t installed our demo content and want to have page contact form on your web-site we suggest you to use popular plugin for creating custom forms called Contact Form 7.
This plugin comes with our theme as a recommended one. After you install and activate this tool you will have basic contact form created and can place it to your page as a Visual Composer element. Or you can create your own form in Admin -> Contact -> Add New.
Plugin’s Documentation

Update theme To top

NOTE: If you did some customization/code changes directly in our theme files you might loose them after updating all files

We suggest you to customize our theme using child theme and don’t change actual theme files as this will make it easier to update your parent theme.

Manual Update

Before updating we suggest you to do a back up (save the copy of all your files) and make sure that you are using the latest version of WordPress and WooCommerce. To update our theme you need to download the latest version from themeforest, rename or delete your current theme folder and Upload it from the admin panel or FTP client (see uploading guide)

Automatic Update

We recommend you to use “Easy Theme and Plugin Upgrades” plugin to update existing plugins and themes, including our own theme. With this tool you don’t need to rename or delete your theme through the FTP. Just upload new archive and it will replace your existing files.

Usefull links:

Child theme To top

A child theme is a theme that inherits the functions and styles of the other theme, called the parent theme. Child themes are the recommended way of modifying an existing theme. Our theme has full support for creating child theme.

How to create child theme
A Guide To: WordPress Child Themes Development

Translation To top

Our theme is ready for translation with Poedit. POT file in languages/yourthemename.pot

To translate your site content you can use WPML plugin, this tool is completely supported by our theme.